Monday, October 31, 2011
Color Tiles, Craft Sticks and Patterns
To practice patterns, I like to use color tiles and craft sticks. The students separate each repeating section using a craft stick. I like to have them repeat the core 3 times. This way the pattern has time to develop but doesn't go on forever! In these patterns the students each repeated the pattern twice then rotated to the next chair and repeated their neighbor's pattern the third time. I like to have the students think beyond just color patterns into the positions of the blocks as well. One student even chose to do two patterns at once. After the students add the 3rd repetition, they remove it before rotating around to the next person's desk. We rotate anywhere between 10 to 15 times giving the students lots of practice on a different child created pattern each time. Photos of these patterns will be printed and placed in the pattern work station for the kids to practice again and again. The relevance to their own creations captures their attention and the rigor involved in extending some of their patterns challenges their minds. A great combination! :)
Sunday, October 30, 2011
Real Object Digraph Sort
The students had a homework assignment to bring an object from home that began with a /wh/ /ch/ /th/ or /sh/ digraph. The students shared their objects, and we sorted them on the floor. Sorry for the up-side-down photo. I labeled both the top and bottom of the chart paper so all of the kids could see since we were sitting in a circle.
Shapely Pets!
For short e week we studied and read about pets. Since we were also studying 2 D shapes in math, we combined the two and created Shape Pets! The students then used the names of the shapes in our observational comment writing lessons for the week (Write from the Beginning) to construct descriptive sentences about their shape pet. I also placed extra shapes, paper and shape books in the shapes work station for kids to create and write about more shapely pets!
Saturday, October 29, 2011
Graph Puzzles
A great way to help kids understand the components of a graph and how all the parts "fit together" is to make puzzles out of the graphs you've made together in class and have the students practice putting the puzzles together. I transferred the information from the large graphs we made as a class to smaller paper. I just quickly hand wrote these, made copies and cut them apart. (I am not too fancy as you may have noticed :) As they build the puzzles, you'll hear groups using saying things like, "This is the title. It goes at the top." OR "The numbers have to go in counting order at the bottom." We used these puzzles earlier in the year, but as the year progresses, I'll cut the puzzles into more pieces. I think kids need A LOT of practice with puzzles to build thinking, reasoning and memory skills anyway so why not get the most bang for your buck? I have added these puzzles to my graphing work station. The kids really like doing them. One tip...make sure to copy each graph on different colored paper or mark the back of each piece with a unique color or symbol so if the pieces of different puzzles get mixed up, it's easy for the kids to sort out. Mark a plastic bag with the matching color or symbol for storage.
Friday, October 28, 2011
Speed Sorting
Students "speed sort" picture cards by beginning sound (in this case sh, s, and h) on simple 3 column laminated mats that they reuse over and over again each week during Words Their Way word study lessons. After sorting the words in a whole group setting using a **pocket chart, each student gets his/her own set of cards to cut out. I time the class, record the time and we try to do it faster the second time, etc. Simple but effective and fun for the kids. Note: Make sure the kids are taking all the cards off and MIXING them up after each sort. Some try to stack them up in order to make it faster to put them all back on the mat. I really watch them actual mix them all up. :)
**One idea I've tried this year to help me better assess the kids during the whole group pocket chart sorting time is to assign each sound a number and label it with a sticky note. I say the word and the kids hold up the number of fingers that corresponds to the first sound they hear. (Since this is a phonemic awareness activity, the picture is not shown.) I can quickly visually scan to see who is having trouble and work with those students further.
EX: th (1) sh (2) ch (3)
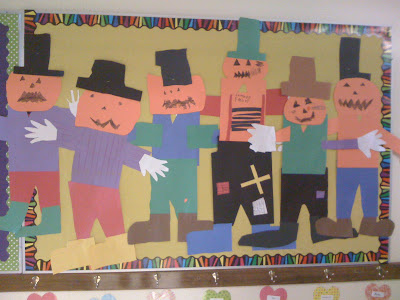
Scarecrow Fun...
After reading The Little Old Lady Who Wasn't Afraid of Anything, we retold the story by making our scarecrow parts...
2 shoes that went clomp, clomp
1 pair of pants that went wiggle, wiggle,
1 shirt that went shake, shake,
1 pair of gloves that went clap, clap
1 hat that went nod, nod
and 1 scary pumpkin head that went... BOO! BOO!
We then wrote descriptive sentences about our scarecrows using our Write From the Beginning thinking map format.
I had the kids use sheets of 8 1/2 by 11 paper for the parts, but since they came out so huge, I'd recommend cutting that in half. :)
Magic School Bus Lunches!
As a discipline incentive for tables who following directions, cooperate and generally work together without squabbling...I give table points. Very simple, but very effective. When a table earns 10 points shown using tally marks, the whole table gets to eat lunch in the classroom and watch a Discovery Streaming Magic School Bus video on the projector screen. They love it and work for it! Simple, easy and - best of all - doesn't cost a dime! :)
Thursday, October 27, 2011
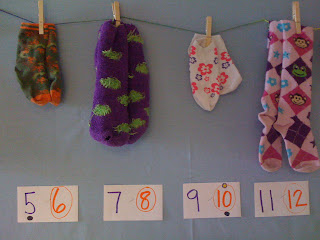
Crazy Socks Skip Counting Clothesline
Each year I ask the kids to bring in a pair of socks and we build a counting by 2's clothesline. I write the odd and even numbers in two different colors, put a dot below the multiples of 5 and circle, a star above the multiples of 10 and I circle the multiples of 2. This year, I asked the kids to bring in crazy socks which made the activity more fun and colorful. I also extended the use of this number line by using Post-It notes to cover some of the numbers and having the students tell what numbers were covered. Note - I used yarn and clothespins, but had to staple the yarn in several places to keep it from stretching and sagging. :)
Little Teachers...
These are just a couple photos of two students working together to record the results of a vote we took using ballot method. One student is opening the ballots and reading off the results while the other is using tally marks to record the information. This information will be used to create a graph by all of the students.
Wednesday, October 26, 2011
Journaling and Sharing Circles
Each morning my students come into the classroom, sharpen their pencils, turn in their homework folders, get a drink and begin writing in their journals. The students write about topics of their own choice (usually Good News!) and know that at the end of journal writing time, they will get into sharing circles for about 5 minutes, read their entries and be questioned (using question words such as who, what, when, where, why and how) by their peers who will want to find out more! As we've practiced being good listeners and questioners and the writing has progressed, the students have challenged themselves to write so thoroughly that their peers will have trouble coming up with a question that wasn't answered in the writing. As a reminder to the students I post a question word poster with pictures that I created. We've been focusing on 3 question words and have color coded them (who - yellow; where - green; when - pink). The students underline the words in their own writing that answer each of these questions in the corresponding color. It really forces them to elaborate a little bit more - extending and adding sentences. Over the next several weeks, we will add more question words to answer in our writing such as "why - blue." Special note - right before we get into our sharing circles, I have the students practice reading what they wrote to themselves. Many find words they inadvertently left out and make the corrections right then - before they start to share with their peers.
I've found that by having the students answer these questions in their own writing, they are better able to answer these questions about the books we read and content we study. In addition, we work on our listening and speaking skills as well as comprehension and writing. Again... a lot of bang for the buck! :)
Tuesday, October 25, 2011
Greater Than, Less Than & Equal
I like this idea from CScope to give kids both an interactive and visual model of greater than, less than and equal to. This is normally a difficult concept; however this year, my students refer back to our pouring the liquid in the two cups pictured back and forth comparing the water levels. We then worked together to make the posters so we would have a visual to refer to for the rest of the year. The colored water has long since evaporated from the cups (which was another discussion altogether), but the students look at the pictures all the time!
Monday, October 24, 2011
Teaching "Retelling"
My students always have trouble retelling a story in summary form using beginning, middle and end. It's hard for young readers to decide what is important and not important. Some get confused and think they need to retell every word and for others writing anything at all is just to overwhelming. Let's be honest... it's hard to teach - at least for me - even after 19 years. Rather than just say ok... write the beginning, middle and end of the story, this year I created this foldable to help ease the process for the kids. We use and practice answering the "question words" (who, what, when, where, why, how) EVERY day in journal time (will detail in a different post) so I decided to use these question words as a guide for the kids to follow when writing a summary. The foldable is made using a 8 1/2 X 11 sheet of manila paper. I pre-folded about a 1/4 of the paper and then cut that flap into 3 equal sections. The kids label the first section with Who? When and/or Where? What? The students construct a sentence about how the story starts using the characters, setting, and what the problem is or what is initially going on. On the second flap, the students label up to 3 What? What? What? and choose up to 3 important events to write about the middle of the story. On the third flap, the students label How? and write about how the problem was solved or how the story ended. It's important to note that the question words can change depending on the story, but the basic framework still remains the same. Not all stories have a "problem" and a "solution." Some, like Hey Diddle Diddle (above) have something going on and a surprise ending. A Why? could also be added in any section depending on the story. The students can then illustrate a picture to go with the beginning, middle and end sentences as seen above.
We will of course be practicing this over and over until the students are able to do it alone, but even the first couple of times it seemed to help even the most struggling readers retell the story. This foldable could also be used in a reading work station after the kids have had lots of practice.
Thinking Maps and Guided Reading
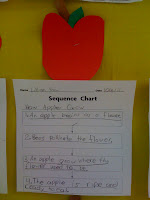
In a whole group lesson, the students used a vertical sequencing flow map to order the events in the book How Apples Grow after we discussed the book and practiced orally with a partner several times. We made construction paper apples for a little fun and touch of Fall. After modeling and using this thinking map several times, the students will now begin to use this thinking map in small groups to order the events in their guided reading books. I keep copies of the thinking maps that have been used and modeled extensively in whole group lessons such as circle maps, flow maps (including beginning, middle and end) and the one pictured, bubble maps, etc. handy in my guided reading area. This is a fast and simple way to deliver powerful differentiated instruction because the books the kids use to complete the maps are on their own instructional level. Many kids like to work with a partner in their guided reading group and others like to work independently, but all of them have to think about and refer back to the text that is just right for them providing scaffolding and challenge at the same time. While I am reading with one group, other groups are working on their thinking maps and having great literacy discussions much like in literacy circles or book clubs.
Calendar Time Weather
We discuss 4 components of the weather every day during calendar time. I have two students who are responsible for giving a report on the temperature, cloud cover, precipitation and wind speed for the week. Since my classroom is right next to the outside door, these two students us a small silver pom pom to hold up in the wind to determine if the wind is calm, breezy or gusty. They simply observe the sky to see if the sky is clear, partly cloudy or overcast. Then we are fortunate to have a thermometer inside our classroom that shows both the inside and outside temperatures which they can easily read. The students make their report, and we record the information on the graphs pictured above. I've merged some store bought things with some things of my own design...pretty simple but gets the job done. We keep track of each day's temperature using a color coded system for hot, warm, cool and cold and transfer the information to a year-long graph sorted by month so that we can study the color trends and identify weather patterns through the seasons. We also use this weather time to practice counting on the thermometer by 5's and 2's and to discuss "greater than" and "less than" with relevance to actual temperatures. The graph pictured only shows August, but our graph now has red (hot), orange (warm) and green(cool) temperatures recorded showing how the weather temperature is getting cooler as we move into Fall. (Not that cool though...We do live in Texas and it's only almost Halloween. ;)
Subscribe to:
Posts (Atom)